-
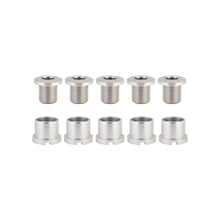
1. **Application Compatibility**: These chainring bolts are versatile and compatible with a wide range of bicycles including single-speed, fixie, BMX, MTB (Mountain Bike), cruiser, hybrid, and road bikes. This makes them suitable for a variety of riding styles and purposes.
2. **Thread Size**: The bolts have an M8 thread size with a pitch of 0.75. This specification indicates that the bolt has a metric thread, and the diameter of the bolt is 8 millimeters, with a thread pitch of 0.75 millimeters. This information is important for ensuring compatibility with the corresponding nuts or threaded holes.
3. **Length**: Each bolt measures 6.5 millimeters in length. This is the overall length of the bolt, including the threaded portion. It is important to ensure that this length is appropriate for the specific application and chainring thickness.
4. **Bolt Head Type**: The bolts have a 4mm length bolt head. This refers to the distance from the bottom of the bolt head to the tip. This information is crucial for selecting the correct tool for installation.
5. **Material**: The chainring bolts are typically made of a durable and corrosion-resistant material such as stainless steel or aluminum alloy. This ensures that they can withstand the rigors of cycling and exposure to the elements.
6. **Design Features**: Chainring bolts are designed with a specific head shape, such as Allen (hex) or Torx, to allow for easy installation and removal. They may also feature a flanged head to distribute pressure and prevent over-tightening.
7. **Quantity**: The set likely includes a specific number of bolts, which is important to consider if you are replacing bolts on a multiple-chainring setup or if you want extras for future maintenance.
8. **Usage Recommendations**: These chainring bolts are suitable for securing single-speed chainrings, making them ideal for bikes with a single gear setup. They are designed to securely hold the chainring in place during riding.
9. **Universal Fit**: The M8 thread size is a common standard, making these chainring bolts compatible with a wide range of chainring brands and models. However, it's always a good idea to double-check compatibility with your specific chainring and crankset.
In summary, this set of chainring bolts with an M8-0.75 thread size, 6.5mm length, and 4mm length bolt head is a versatile and compatible option for securing single-speed chainrings on various types of bicycles. They are made from durable materials and feature a design that facilitates easy installation and removal.- For use with single chainring cranksets
- Inside height measures 4mm when tightened, 7mm total height
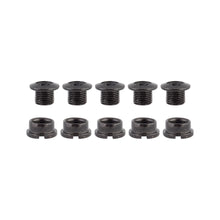
- Set of 5 bolts and nuts
- Available in multiple colors: Black or Chrome
Mount Compatibility: MX/Single Type: M8x6.5mm Bolt / M8x4mm Nut Material: AL6061 Color: Black or Silver Search Item: Bolts


When it comes to optimizing the performance of your bicycle, choosing the right cranks and bottom bracket is paramount. These components play a crucial role in power transmission and overall efficiency. In this guide, we'll explore the various types of cranks and bottom brackets available, and provide insights on how to select the perfect combination for your specific bike.

Types of Cranks
1. Square Taper
The square taper is one of the earliest designs and is characterized by a square-shaped interface between the crank arm and the bottom bracket spindle. It's a robust and reliable system, commonly found on older bikes. While it may lack some of the modern refinements, it remains a popular choice for many enthusiasts.
2. Octalink
Introduced by Shimano, the Octalink system features eight splines on the crank arm that engage with corresponding splines on the bottom bracket spindle. This design provides a more secure connection and improved power transfer compared to square taper designs.
3. Hollowtech II
Hollowtech II cranks, also from Shimano, utilize a two-piece design with an external bottom bracket. This design reduces weight and enhances stiffness, resulting in improved power transfer and efficiency. They are widely used in modern high-performance bikes.
4. ISIS Drive
ISIS (International Splined Interface Standard) Drive cranks feature a 10-spline interface, providing a large contact area between the crank arm and spindle. This design offers excellent stiffness and is commonly found on mountain bikes.
5. **BB30 and PressFit 30
BB30 and PressFit 30 bottom brackets have larger bearings and a larger spindle diameter than standard designs. This reduces weight and increases stiffness, providing enhanced power transfer. They are popular choices for high-end road and mountain bikes.

Types of Bottom Brackets
1. Threaded (BSC)
Threaded bottom brackets are the traditional type, screwing directly into the frame's threaded shell. They are reliable and easy to install, making them a popular choice for a wide range of bikes.
2. PressFit
PressFit bottom brackets are pressed directly into the frame, eliminating the need for threads. This design allows for a larger diameter spindle, resulting in increased stiffness and weight savings.
T47 is a newer standard that combines the benefits of threaded and PressFit designs. It utilizes a threaded shell but with a larger diameter, allowing for larger bearings and improved stiffness.
Choosing the Right Combination
Selecting the correct cranks and bottom bracket depends on various factors:
1. Frame Compatibility
Ensure the bottom bracket is compatible with your frame. Different frames have specific bottom bracket shell widths and threading standards.
2. Crankset Type
Choose a crankset that matches your riding style. For example, if you're into high-performance road cycling, a lightweight, stiff crankset like Hollowtech II might be ideal.
3. Budget and Weight Considerations
Higher-end materials and designs often come at a premium. Consider your budget and whether shaving off a few grams is critical for your riding goals.
4. Maintenance and Durability
Consider the maintenance requirements and durability of the chosen system. Some designs may require more attention and servicing than others.
Conclusion
Selecting the right cranks and bottom bracket for your bike is a crucial step towards optimizing performance. Understanding the various types and their benefits will help you make an informed decision. Always consult with a professional or refer to the manufacturer's recommendations for compatibility and installation guidelines. With the right combination, you'll experience a smoother, more efficient ride, whether you're cruising on the road or tackling rugged trails.


Tools Needed:
1. Crank puller tool
2. Allen wrench or wrench (for some models)
3. Adjustable wrench (if needed)
Steps:
1. Prepare Your Workspace:
- Find a clean, well-lit area to work.
- Make sure you have enough space to maneuver around the bike.
- Consider placing a towel or mat underneath to catch any small parts that might fall.
2. Shift the Gears:
- Shift the chain onto the smallest chainring and smallest rear cog. This relieves tension on the chain, making it easier to work.
3. Remove the Crank Bolts:
- Use an Allen wrench or wrench (depending on your crankset) to remove the bolts securing the crank arms to the spindle. These are typically located on the non-drive side.
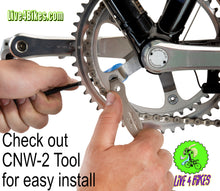
4. Install the Crank Puller:
- Take your crank puller tool and thread it into the crank arm that you want to remove. Make sure it's screwed in securely but not so tight that it damages the threads.
5. Use the Crank Puller:
- Turn the handle of the crank puller clockwise. This will push against the spindle, gradually pulling the crank arm off. If it's difficult to turn, make sure you've threaded the tool in correctly.
6. Repeat for the Other Side:
- Move to the other side of the bike and repeat steps 3-5.
7. Remove the Crank Arms:
- Once the crank arms are pulled off, they should slide easily off the spindle. Be careful not to drop them.
8. Clean and Inspect:
- Take this opportunity to clean the crank arms and the bottom bracket area. Inspect the bottom bracket and spindle for any signs of wear or damage.
9. Reassembly (if necessary):
- If you're replacing the crankset, follow the reverse steps to install the new one. Make sure to properly torque the bolts to the manufacturer's specifications.
Remember, if you're unsure about any step or if your bike has unique components, it's always best to consult the specific manual for your bicycle or seek assistance from a professional at a bike shop. Additionally, having the right tools is crucial for this job, so make sure you're using the appropriate crank puller for your specific crankset.


